Sometimes we need to use custom caps. Figure 9.8 shows a line with customized caps of different sizes.
The CustomLineCap and AdjustableArrowCap classes provide functionality to draw custom line caps. CustomLineCap allows us to define custom caps, which can be attached to a pen- then an application can use the pen to draw graphics objects.
The CustomLineCap class constructor takes two parameters of type GraphicsPath. The first parameter defines the fill path, which identifies the fill for the custom cap. The second parameter defines the stroke path, which defines the outline of the custom cap. The fill path and stroke path parameters cannot be used at the same time.
FIGURE 9.8: A line with customs caps
To create a CustomLineCap object, first we create a GraphicsPath object and add items to the path such as a line, ellipse, or rectangle using any of the add methods. Then we pass the GraphicsPath object as an argument to CustomLineCap. The following code snippet shows how to create a CustomLineCap object:
GraphicsPath path1 = New GraphicsPath()
' Add items to GraphicsPath
Dim cap1 As CutomLineCap = New CustomLineCap(Nothing, path1)
Once we have a CustomLineCap object, we can set the CustomStartCap and CutomEndCap properties of the pen to apply custom line caps. We will see a full working example of custom line caps in a moment.
Table 9.4 describes the properties of the CustomLineCap class.
Line joins
A line join defines how lines and curves are joined in a graphics path. The LineJoin enumeration represents a line join. Its members are described in Table 9.5.
We can set the line join of a pen using its LineJoin property. To see the line joins, we create aWindowsapplication and add a group box, four radio buttons, and a button to the form. The final form looks like Figure 9.9.
TABLE 9.4: CustomLineCap properties
|
Property
|
Description
|
|
BaseCap
|
The base line cap. LineCap enumeration type.
|
|
BaseInset
|
The distance between the cap and the line.
|
|
StrokeJoin
|
How lines and curves in the path that will be stroked are joined. LineJoin enumeration type.
|
|
WidthScale
|
Width scale of custom line cap. A WidthScale value of 2 methods that the cap will be double the pen size that is drawing the line cap.
|
TABLE 9.5: LineJoin members
|
Member
|
Description
|
|
Bevel
|
Beveled join with a diagonal corner.
|
|
Miter
|
Mitered join with a sharp corner or a clipped corner.
|
|
MiterClipped
|
Mitered join with a sharp corner or a beveled corner.
|
|
Round
|
Circular join with a smooth, circular arc between the lines.
|
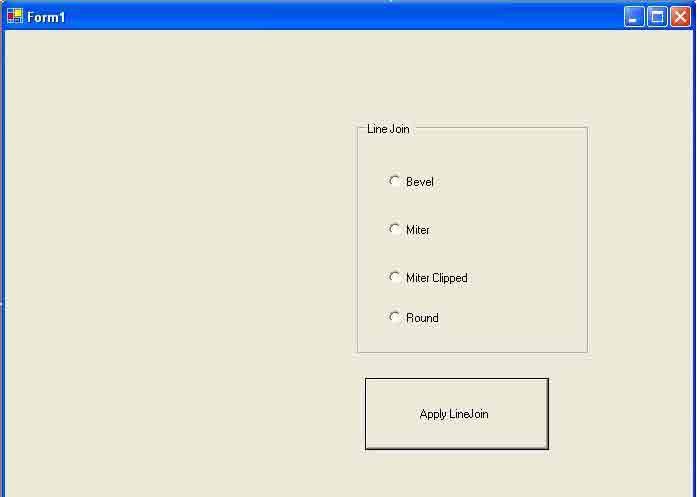
FIGURE 9.9: The line join test application
When we select different line join types and hit the Apply LineJoin button, the application draws lines with different joins.
The code for the Apply LineJoin button click event handler and DrawJoinedLines method is given in Listing 9.6. As the listing shows, the Apply LineJoin button click event handler calls the DrawJoinedLines method with a LineJoin value determined by the current selection.
LISTING 9.6: The Apply LineJoin button click event handler
Private Sub ApplyLineJoin_Click(ByVal sender As Object, ByVal e As System.EventArgs)
' Create a Graphics object
Dim g As Graphics = Me.CreateGraphics()
g.Clear(Me.BackColor)
' Line join type
If BevelRadBtn.Checked Then
DrawJoinedLines(g, LineJoin.Bevel)
End If
If MiterRadBtn.Checked Then
DrawJoinedLines(g, LineJoin.Miter)
End If
If MiterClippedRadBtn.Checked Then
DrawJoinedLines(g, LineJoin.MiterClipped)
End If
If RoundRadBtn.Checked Then
DrawJoinedLines(g, LineJoin.Round)
End If
' Dispose of object
g.Dispose()
End Sub
Private Sub DrawJoinedLines(ByVal g As Graphics, ByVal JoinType As LineJoin)
' Set smoothing mode
g.SmoothingMode = SmoothingMode.AntiAlias
' Create a pen with width 20
Dim redPen As New Pen(Color.Red, 20)
' Set line join
redPen.LineJoin = JoinType
' Create an array of points
Dim pts As Point() = {New Point(150, 20), New Point(50, 20), New Point(80, 60), New Point(50, 150), New Point(150, 150)}
' Create a rectangle using lines
Dim pts1 As Point() = {New Point(200, 20), New Point(300, 20), New Point(300, 120), New Point(200, 120), New Point(200, 20)}
' Draw lines
g.DrawLines(redPen, pts)
g.DrawLines(redPen, pts1)
' Dispose of object
redPen.Dispose()
End Sub
Now if we run the code, the Bevel linejoin output looks like Figure 9.10.
The Miter line join output looks like Figure 9.11.
The Round line join output looks like Figure 9.12.
FIGURE 9.10: The Bevel line join effect
FIGURE 9.11: The Miter line join effect
Conclusion
Hope the article would have helped you in understanding Customizing Line Caps and Line joins in GDI+. Read other articles on GDI+ on the website.