In this article we will learn how to use Border control in Silverlight.
Border control
Border control is a Silverlight control that acts as a border. You can put ONE other control in it and it will act as border of the child control.
For example:
This example shows a simple demo of the Border control.
Drag a Border control from the Toolbox on the form.

Figure 1.
XAML code:
<UserControl x:Class="SilverlightApplication4.MainPage"
xmlns="http://schemas.microsoft.com/winfx/2006/xaml/presentation"
xmlns:x="http://schemas.microsoft.com/winfx/2006/xaml"
xmlns:d="http://schemas.microsoft.com/expression/blend/2008"
xmlns:mc="http://schemas.openxmlformats.org/markup-compatibility/2006"
mc:Ignorable="d"
d:DesignHeight="300" d:DesignWidth="400">
<Grid x:Name="LayoutRoot" Background="White">
<Border BorderBrush="#FF62492D" BorderThickness="1" Height="100"HorizontalAlignment="Left" Margin=
"10,10,0,0" Name="Border1" VerticalAlignment="Top"Width="200" />
</Grid>
</UserControl>
Using BorderThickness property
If the thickness is a positive value, the border is drawn inside the object's bounding box. If the thickness is negative, the border is drawn outside the object's bounding box.
Figure 2.
XAML code:
<Grid x:Name="LayoutRoot" Background="White">
<Border BorderBrush="#FF62492D" BorderThickness="4,6,8,10" Height="100"HorizontalAlignment= "Left" Margin="10,10,0,0" Name="Border1" VerticalAlignment="Top"Width="200" />
</Grid>
Using BorderBrush property
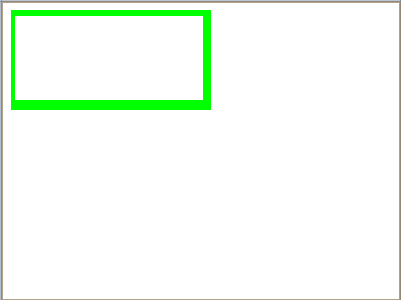
Figure 3.
XAML code:
<Grid x:Name="LayoutRoot" Background="White">
<Border BorderThickness="4,6,8,10" Height="100" HorizontalAlignment="Left"Margin=
"10,10,0,0" Name="Border1" VerticalAlignment="Top" Width="200" BorderBrush="Lime"></Border>
</Grid>
Using BackGround property
Background property can be used in the same manner as the BorderBrush property. The following example will demonstrates it:
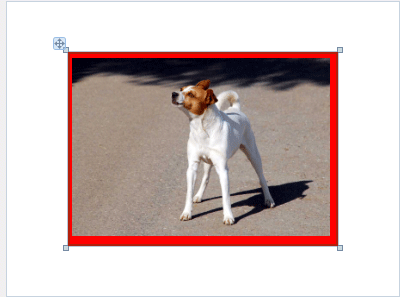
Figure 4.
XAML code:
<Border BorderBrush="Red" BorderThickness="4,6,8,10" Height="194" Name="Border1"Width="270">
<Border.Background>
<ImageBrush ImageSource="/SilverlightApplication4;component/Images/dog-animal.jpg" />
</Border.Background>