Scaling Colors
Scaling color involves multiplying a color component value by a scaling factor. For example, the t1, t2, t3, and t4 values in the following color matrix represent the red, green, blue, and alpha components, respectively. If we change the value of M [2][2] to 0.5, the transformation operation will multiply the green component by 0.5, cutting its intensity by half.
Color Matrix = {
{
t1, 0, 0, 0, 0
}
,
{
0, t2, 0, 0, 0
}
,
{
0, 0, t3, 0, 0
}
,
{
0, 0, 0, t4, 0
}
,
{
0, 0, 0, 0, 1
}
Listing 10.19 uses the ColorMatrix object to scale image colors.
LISTING 10.19: Scaling colors
Imports System.Collections.Generic
Imports System.ComponentModel
Imports System.Data
Imports System.Drawing
Imports System.Drawing.Drawing2D
Imports System.Drawing.Imaging
Imports System.Text
Imports System.Windows.Forms
Public Class Form1
Private Sub Form1_Paint(ByVal sender As System.Object, ByVal e As System.Windows.Forms.PaintEventArgs) Handles MyBase.Paint
'Create a Graphics object
Dim g As Graphics = Me.CreateGraphics()
g.Clear(Me.BackColor)
'Create a Bitmap object
Dim curBitmap As New Bitmap("c:/Blue hills.jpg")
'color matrix elements
Dim ptsArray As Single()() = {New Single() {1, 0, 0, 0, 0}, New Single() {0, 0.8F, 0, 0, 0}, New Single() {0, 0, 0.5F, 0, 0}, New Single() {0, 0, 0, 0.5F, 0}, New Single() {0, 0, 0, 0, 1}}
'Create a ColorMatrix object
Dim clrMatrix As New ColorMatrix(ptsArray)
'Create image attributes
Dim imgAttribs As New ImageAttributes()
'Set color matrix
imgAttribs.SetColorMatrix(clrMatrix, ColorMatrixFlag.[Default], ColorAdjustType.[Default
)
'Draw image with no effects
g.DrawImage(curBitmap, 0, 0, 200, 200)
'Draw image with image attributes
g.DrawImage(curBitmap, New Rectangle(205, 0, 200, 200), 0, 0, curBitmap.Width, curBitmap.Height, _
GraphicsUnit.Pixel, imgAttribs)
'Dispose of objects
curBitmap.Dispose()
g.Dispose()
End Sub
End Class
Figure 10.25 shows the output from Listing 10.19. The original image is on the left; on the right is the image after color scaling. If you change the values of t1, t2, t3, and t4 you will see different results.
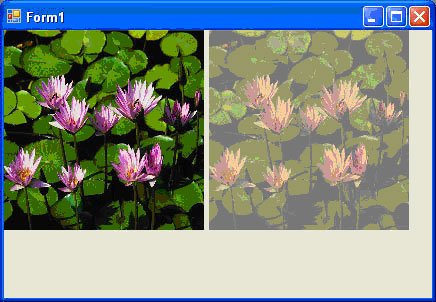
FIGURE 10.25: Scaling colors
Shearing Colors
Earlier in this article we discussed image shearing. It can be thought of as anchoring one corner of a rectangle region and stretching the opposite corner horizontally, vertically, or in both directions. Shearing colors is the same process, but here the object is the color instead of the image.
Color shearing increases or decreases a color component by an amount proportional to another color component. For example, consider the transformation in which the red component is increased by one half the value of the blue component. Under such a transformation, the color (0.2, 0.5, 1) would become (0.7, 0.5, 1). The new red component is 0.2+ (0.5)(1) = 0.7. The following color matrix is used to shear image colors.
Dim ptsArray As Single()() = {New Single() {1, 0, 0, 0, 0}, New Single() {0, 1, 0, 0, 0}, New Single() {0.5F, 0, 1, 0, 0}, New Single() {0, 0, 0, 1, 0}, New Single() {0, 0, 0, 0, 1}}
Dim clrMatrix As New ColorMatrix(ptsArray)
If we substitute this color matrix into Listing 10.19, the output will look like Figure 10.26.
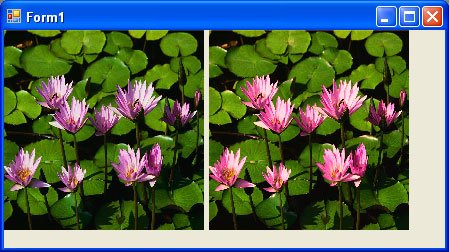
FIGURE 10.26: Shearing colors
Rotating Colors
As explained earlier, color in GDI+ has four components: red, green, blue, and alpha. Rotating all four components in a four-dimensional space is hard to visualize. However, such rotation can be visualized in a three dimensional space. To do this, we drop the alpha component from the color structure and assume that there are only three colors-red, green, and blue as shown in Figure 10.27. The three colors-red, green, and blue are perpendicular to each other, so the angle between any tow primary colors is 90 degrees.
Suppose that the red, green, and blue colors are represented by points (1, 0, 0), (0, 1, 0), and (0, 0, 1), respectively. If we rotate a color with a green component of 1, and red and blue component of 0 each, by 90 degrees, the new color will have a red component of 1 and green and blue component of 0 each. If we rotate the color less than 90 degrees, the new color will be located somewhere between green and red.
Figure 10.28 shows how to initialize a color matrix to perform rotations about each of the three components: red, green, and blue.
Listing 10.20 rotates the colors by 45 degrees from the red component.
LISTING 10.20: Rotating colors
Imports System.Collections.Generic
Imports System.ComponentModel
Imports System.Data
Imports System.Drawing
Imports System.Drawing.Drawing2D
Imports System.Drawing.Imaging
Imports System.Text
Imports System.Windows.Forms
Public Class Form1
Private Sub Form1_Paint(ByVal sender As System.Object, ByVal e As System.Windows.Forms.PaintEventArgs) Handles MyBase.Paint
Dim degrees As Single = 45.0F
Dim r As Double = degrees * System.Math.PI / 180
'Create a Graphics object
Dim g As Graphics = Me.CreateGraphics()
g.Clear(Me.BackColor)
'Create a Bitmap object from a file
Dim curBitmap As New Bitmap("c:/Blue hills.jpg")
'Color matrix elements
Dim ptsArray As Single()() = {New Single() {CSng(System.Math.Cos(r)), CSng(System.Math.Sin(r)), 0, 0, 0}, New Single() {CSng(-System.Math.Sin(r)), CSng(-System.Math.Cos(r)), 0, 0, 0}, New Single() {0.5F, 0, 1, 0, 0}, New Single() {0, 0, 0, 1, 0}, New Single() {0, 0, 0, 0, 1}}
'Create a ColorMatrix object
Dim clrMatrix As New ColorMatrix(ptsArray)
'Create image attributes
Dim imgAttribs As New ImageAttributes()
imgAttribs.SetColorMatrix(clrMatrix, ColorMatrixFlag.[Default], ColorAdjustType.[Default
)
'Draw image with no effects
g.DrawImage(curBitmap, 0, 0, 200, 200)
'Draw image with image attributes
g.DrawImage(curBitmap, New Rectangle(205, 0, 200, 200), 0, 0, curBitmap.Width, curBitmap.Height, _
GraphicsUnit.Pixel, imgAttribs)
'Dispose of objects
curBitmap.Dispose()
g.Dispose()
End Sub
End Class
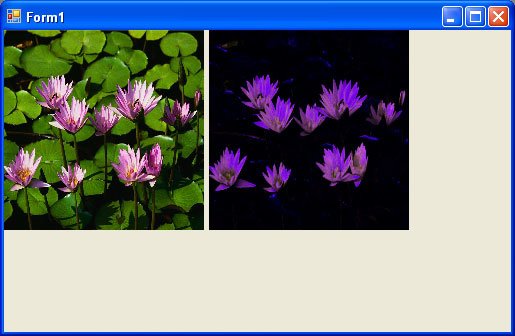
FIGURE 10.29: Rotating Colors
Figure 10.29 shows the output from Listing 10.20. On the left is the original image; on the right is the image after color rotation.
Conclusion
Hope the article would have helped you in understanding Scaling, Shearing and Rotating Colors in GDI+. Read other articles on GDI+ on the website.