Introduction:
Site Navigation was one of major problems in website programming with ASP and ASP.NET early versions. ASP.NET 2.0 is coming with new features and controls to solve them. These features produced big enhancement in Navigation controls.
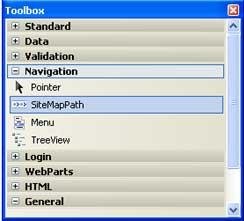
Navigation controls:
ASP.NET 2.0 has three new Navigation controls.
- SiteMapPath
- Menu
- TreeView
Navigation controls are given below:
SiteMapPath:
Use of this control is very simple. You can add this control to your page then view your page in browser. The SiteMapPath control displays the navigation path of the current page. The path acts as clickable links to previous pages.
The SiteMapPath control uses the web.sitemap file by default.
Code of SiteMapPath:
<asp:SiteMapPath ID="SiteMapPath1" runat="server"></asp:SiteMapPath>
SiteMapPath representation:

Example: In this Example you will see the source code of the SiteMapPath with some properties.
<%@ Page Language="VB" AutoEventWireup="true" CodeFile="Default.aspx.vb" Inherits="_Default" %>
<!DOCTYPE html PUBLIC "-//W3C//DTD XHTML 1.0 Transitional//EN" "http://www.w3.org/TR/xhtml1/DTD/xhtml1-transitional.dtd">
<html xmlns="http://www.w3.org/1999/xhtml" >
<head runat="server">
<title>SiteMapPath</title>
</head>
<body>
<form id="form1" runat="server">
<div>
<asp:SiteMapPath ID="SiteMapPath1" runat="server" Font-Names="Verdana" Font-Size="0.8em" PathSeparator=" : " BackColor="#C0FFFF" BorderColor="Aqua" BorderStyle="Inset" Height="40px" Width="400px">
<PathSeparatorStyle Font-Bold="True" ForeColor="#990000" />
<CurrentNodeStyle ForeColor="#333333" />
<NodeStyle Font-Bold="True" ForeColor="#990000" />
<RootNodeStyle Font-Bold="True" ForeColor="#FF8000" />
</asp:SiteMapPath>
</div>
</form>
</body>
</html>
Design view of the SiteMapPath

Menu Control
It was the very difficult task to maintain the menu of a large website and time consuming. It is used to display the Menus. You can use it as easy as other Navigation controls. Menu can be stored in a file to make it easier to maintain. This file is normally called web.sitemap, and is stored in the root directory of the web.
Example: In the following example you will see how the Menu controls create.
Step 1: Open the new website.
Step 2: Open ASP.NET Website.
Step 3: Drop the Menu control on the web form from the toolbox.
Step 4: Now right click on the Menu control and select edit menu item after that we edit menu items.
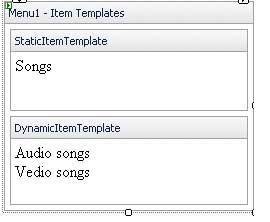
Step 5: Now right click on Menu control and select edit template then we add item template as static and dynamic item template as follows:
Step 6: Write the code on menu itemClick().
Step 7: At last Debug the code.
Source code of the Menu Control:
<%@ Page Language="VB" AutoEventWireup="true" CodeFile="Default.aspx.vb" Inherits="_Default" %>
<!DOCTYPE html PUBLIC "-//W3C//DTD XHTML 1.0 Transitional//EN" "http://www.w3.org/TR/xhtml1/DTD/xhtml1-transitional.dtd">
<html xmlns="http://www.w3.org/1999/xhtml" >
<head runat="server">
<title>Untitled Page</title>
</head>
<body>
<form id="form1" runat="server">
<div>
<asp:Menu ID="Menu1" runat="server">
<DynamicItemTemplateAudio songs<br />Video songs<br />
</DynamicItemTemplate>
<StaticItemTemplate>Songs<br /></StaticItemTemplate>
<Items>
<asp:MenuItem Text="Songs" Value="Songs">
<asp:MenuItem Text="New Item" Value="New Item"> </asp:MenuItem>
</asp:MenuItem>
</Items>
</asp:Menu>
</form>
</body>
</html>
Output of the above source code is as follows:

Now we click on songs then we get following output.
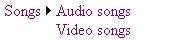
You can change the layout of this control with Orientation property.
By default layout is vertical.
TreeView control:
A TreeView control displays a hierarchical list of items using lines to connect related items in a hierarchy. Each item consists of a label and an optional bitmap. Windows Explorer uses a TreeView control to display directories. You can use the TreeView control in any situation in which you need to display hierarchical data.
Source code of TreeView control is as follows:
<asp:TreeView ID="TreeView1" runat="server"> </asp:TreeView>
Example: We want to create the Employee's information in the hierarchical structure by using the TreeView control.
<%@ Page Language="VB" AutoEventWireup="true" CodeFile="Default.aspx.vb" Inherits="_Default" %>
<!DOCTYPE html PUBLIC "-//W3C//DTD XHTML 1.0 Transitional//EN" "http://www.w3.org/TR/xhtml1/DTD/xhtml1-transitional.dtd">
<html xmlns="http://www.w3.org/1999/xhtml" >
<head runat="server">
<title>Untitled Page</title>
</head>
<body>
<form id="form1" runat="server">
<div>
<asp:TreeView ID="TreeView1" runat="server" BackColor="#FFFF80" BorderColor="DarkCyan"BorderStyle="Outset" ImageSet="BulletedList4" ShowExpandCollapse="False" Width="192px">
<ParentNodeStyle Font-Bold="False" />
<HoverNodeStyle Font-Underline="True" ForeColor="#5555DD" />
<SelectedNodeStyle Font-Underline="True" ForeColor="#5555DD" HorizontalPadding="0px"VerticalPadding="0px" />
<Nodes>
<asp:TreeNode Text="Employee" Value="Employee">
<asp:TreeNode Text="Emp_Name" Value="Emp_Name">
<asp:TreeNode Text="First Name" Value="First Name"> </asp:TreeNode>
<asp:TreeNode Text="Last Name" Value="Last Name"> </asp:TreeNode>
</asp:TreeNode>
<asp:TreeNode Text="Emp_Address" Value="Emp_Address">
<asp:TreeNode Text="Local" Value="Local"></asp:TreeNode>
<asp:TreeNode Text="Permanent" Value="Permanent"> </asp:TreeNode>
</asp:TreeNode>
<asp:TreeNode Text="Emp_Contact no" Value="Emp_Contact no">
<asp:TreeNode Text="Home" Value="Home"></asp:TreeNode>
<asp:TreeNode Text="Office" Value="Office"></asp:TreeNode>
</asp:TreeNode>
</asp:TreeNode>
</Nodes>
<NodeStyle Font-Names="Tahoma" Font-Size="10pt" ForeColor="Black" HorizontalPadding="5px"NodeSpacing="0px" VerticalPadding="0px" />
</asp:TreeView>
</div>
</form>
</body>
</html>
Design view of the above code is as follows:
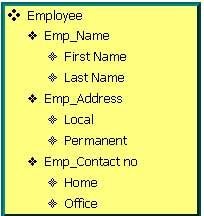
Figure 5: Structure of the TreeView control.