The Panel control is a container control that is used to host a group of similar child controls. One of the major uses I found for a Panel control when you have to show and hide a group of controls. Instead of show and hide individual controls, you can simply hide and show a single Panel and all child controls.
In this article, we will demonstrate how to create and use a Panel control in a Windows Forms application.
Creating a Panel
We can create a Panel control using the Forms designer at design-time or using the Panel class in code at run-time.
Design-time
To create a Panel control at design-time, you simply drag and drop a Panel control from Toolbox to a Form in Visual Studio. After you drag and drop a Panel on a Form, the Panel looks like Figure 1. Once a Panel is on the Form, you can move it around and resize it using mouse and set its properties and events.
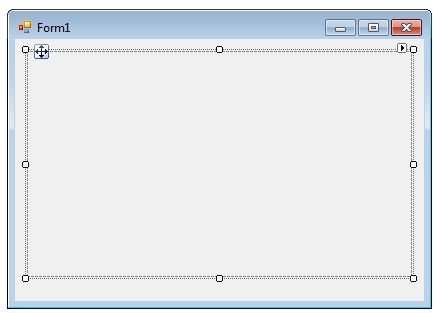
Figure 1
Run-time
Creating a Panel control at run-time is merely a work of creating an instance of Panel class, set its properties and adds Panel class to the Form controls.
First step to create a dynamic Panel is to create an instance of Panel class. The following code snippet creates a Panel control object.
Dim dynamicPanel As New Panel()
In the next step, you may set properties of a Panel control. The following code snippet sets location, size and Name properties of a Panel.
dynamicPanel.Location = New System.Drawing.Point(26, 12)
dynamicPanel.Name = "Panel1"
dynamicPanel.Size = New System.Drawing.Size(228, 200)
dynamicPanel.BackColor = Color.LightBlue
Once the Panel control is ready with its properties, the next step is to add the Panel to a Form. To do so, we use Form.Controls.Add method that adds Panel control to the Form controls and displays on the Form based on the location and size of the control. The following code snippet adds a Panel control to the current Form.
Controls.Add(dynamicPanel)
Setting Panel Properties
After you place a Panel control on a Form, the next step is to set its properties.
The easiest way to set properties is from the Properties Window. You can open Properties window by pressing F4 or right click on a control and select Properties menu item. The Properties window looks like Figure 2.
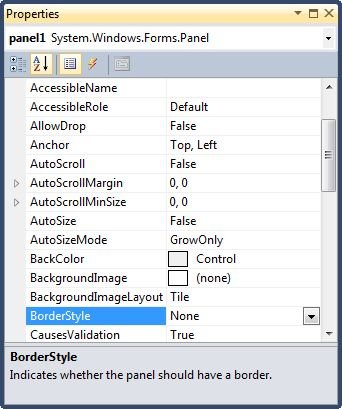
Figure 2
Panel has most of the common control properties. Here I am going to discuss the main purpose of a Panel.
Adding Controls to a Panel
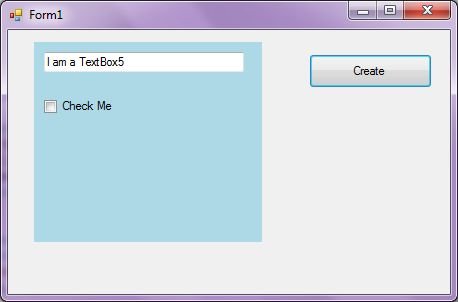
You can add controls to a Panel by dragging and dropping control to the Panel. We can add controls to a Panel at run-time by using its Add method. The following code snippet creates a Panel, creates a TextBox and a CheckBox and adds these two controls to a Panel.
Private Sub CreateButton_Click(ByVal sender As System.Object, ByVal e As System.EventArgs) Handles CreateButton.Click
Dim dynamicPanel As New Panel()
dynamicPanel.Location = New System.Drawing.Point(26, 12)
dynamicPanel.Name = "Panel1"
dynamicPanel.Size = New System.Drawing.Size(228, 200)
dynamicPanel.BackColor = Color.LightBlue
Dim textBox1 As New TextBox()
textBox1.Location = New Point(10, 10)
textBox1.Text = "I am a TextBox5"
textBox1.Size = New Size(200, 30)
Dim checkBox1 As New CheckBox()
checkBox1.Location = New Point(10, 50)
checkBox1.Text = "Check Me"
checkBox1.Size = New Size(200, 30)
dynamicPanel.Controls.Add(textBox1)
dynamicPanel.Controls.Add(checkBox1)
Controls.Add(dynamicPanel)
End Sub
The output looks like Figure 3.
Show and Hide a Panel
I have seen in many applications when you want to show and hide a group of controls on a Form based on some condition. That is where a Panel is useful. Instead of show and hide individual controls, we can group controls that we want to show and hide and place them on two different Panels and show and hide the Panels. To show and hide a Panel, we use Visible property.
dynamicPanel.Visible = False
Summary
In this article, we discussed discuss how to create a Panel control in Windows Forms at design-time as well as run-time. After that, we saw how to use various properties and methods.