Windows Programming using VB.NET
In this article I will explain you about Windows Programming using VB.NET.
In this article, you will learn the basics of the Windows Forms platform and how to write Windows applications using Windows forms and controls. The space allocated to this article prevents an exploration of every control in the System.Windows.Forms namespace, but the following key topics are discussed and should provide the reader an ample grounding with which to tackle any orphaned controls:
- Windows Forms and the advantages of using forms
- Developing Windows applications using Windows Forms
- The basics of the System.Windows.Forms namespace and its classes such as Form, Control, and other control classes
- Working with menus, toolbars, ToolTips, and status bars
- Working with dialog boxes
- Working with common dialog classes
Windows Forms
Windows Forms is a framework located in the System.Windows.Forms.dll assembly for building Windows applications in .NET based on a graphical user interface (GUI). Any language that supports the common language runtime (CLR) can use Windows Forms.
Why Windows Forms?
If you have programmed in Visual Basic (VB), you are probably familiar with forms. In VB, all windows are forms. Controls are placed on forms to develop GUI applications. Visual C++ developers will more likely be familiar with windows and dialogs rather than forms (CWnd and CDialog in Microsoft Foundation Classes [MFC]).
The Microsoft .NET Framework is designed to remedy this "forms versus windows" situation. All windows are forms, including dialog boxes. From all of this synergy, Microsoft coined the term Windows form. Now developers using any .NET-supported language have access to the same windowing classes, whether they work with C#, VB, C++, or any other .NET-compliant language. This language independence has been extended to support many more languages, including COBOL.
In addition to the preceding, the main benefits of Windows Forms are its ease of use, the standardization of the control hierarchy, and that it allows for rapid application development (RAD). Changing the colors and fonts of controls using MFC or Win32 can be a real headache. The .NET Framework has taken care of most such problems and inconveniences.
In addition, Windows Forms applications provide the following:
- Simple and flexible property support, modeled after
- Common control support, including support for font and color dialogs
- Support for Web Services
- Data-aware controls using ADO.NET
- ActiveX support
- GDI+ (Graphical Device Interface +), a better and richer graphics library, which supports alpha blending, texture brushes, advanced transformations, and rich text
- Metadata support
Writing Your First Windows Application
Our first Windows application is a simple one that creates a window. To create a Windows-based application, you derive a class from System.Windows.Forms.Form and call the default constructor, as illustrated in example given below. The Form class acts as a container for other controls.
Example: First Console Windows Application
Imports System.Windows.Forms
' Derive your class from the System.Windows.Forms.Form class\
Module Module1
Public Class WinForm
Inherits Form
End Class
Sub Main()
' Create a Form object
Dim myFrm As New WinForm()
' Set the window title
myFrm.Text = "My First Windows Application"
' Pass form object
Application.Run(myFrm)
End Sub
End Module
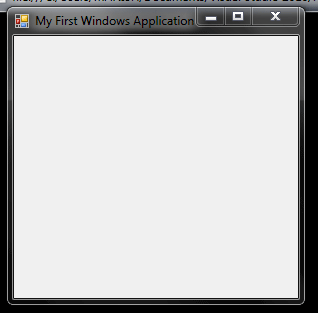
The window's title is set by the form's Text property. The static method Application.Run creates a standard message loop on the current thread. The above example explain you how, creates an empty form with the title "My First Windows Application" in the caption bar.
Output of First Windows Application
In the example given below we adds a button and a text box to the form and creates an event handler for the button. When a user clicks the button, an event is triggered that writes a string to the text box. A reference to the System.Windows.Forms.dll and System.Drawing.dll namespaces must be added before compiling the project.
we create a WinForm class derived from the Form class. After that, we create the Button and TextBox controls. We then set the button and text box properties such as Name, Text, BackgroundColor, ForegroundColor, and Size. The call to the Form.Controls.AddRange method takes an array of controls as a parameter and adds them to the form as indicated in the following code:
myFrm.Controls.AddRange(New System.Windows.Forms.Control() {myFrm.textBox1, myFrm.button1})
An event handler is also created for the Button control. The following code shows how to write a button click event handler for button1. The button1_Click method executes when the button is clicked.
AddHandler myFrm.button1.Click, New System.EventHandler(AddressOf myFrm.button1_Click)
Example of Creating a Windows Application with Controls
Imports System.Windows.Forms
Imports System.Drawing
Module Module1
Class WinForm
Inherits Form
Dim button1 As Button
Dim textBox1 As TextBox
' The button click event handler
Sub button1_Click(ByVal sender As Object, ByVal e As System.EventArgs)
textBox1.Text = "Button is clicked"
End Sub
Shared Sub Main()
Dim myFrm As New WinForm()
' Create Button and TextBox objects
myFrm.button1 = New System.Windows.Forms.Button()
myFrm.textBox1 = New System.Windows.Forms.TextBox()
' Setting the Button control Properties
myFrm.button1.BackColor = System.Drawing.Color.Blue
myFrm.button1.ForeColor = System.Drawing.Color.Yellow
myFrm.button1.Location = New System.Drawing.Point(24, 40)
myFrm.button1.Name = "button1"
myFrm.button1.Size = New System.Drawing.Size(112, 32)
myFrm.button1.TabIndex = 0
myFrm.button1.Text = "Click Me"
' The button click event handler
AddHandler myFrm.button1.Click, New System.EventHandler(AddressOf myFrm.button1_Click)
' Setting the TextBox control Properties
myFrm.textBox1.Location = New System.Drawing.Point(168, 48)
myFrm.textBox1.Name = "textBox1"
myFrm.textBox1.Size = New System.Drawing.Size(104, 20)
myFrm.textBox1.TabIndex = 1
myFrm.textBox1.Text = "textBox1"
' Setting the form Properties
myFrm.AutoScaleBaseSize = New System.Drawing.Size(5, 13)
myFrm.ClientSize = New System.Drawing.Size(292, 273)
myFrm.Controls.AddRange(New System.Windows.Forms.Control() {myFrm.textBox1, myFrm.button1})
myFrm.Text = "My First Windows Application"
myFrm.BackColor = Color.Red
myFrm.ForeColor = Color.Yellow
myFrm.ResumeLayout(False)
Application.Run(myFrm)
End Sub
End Class
End Module
The result of compiling and running the above code is appears in Figure given below, after the button has been clicked.
Figure of Creating a Windows Application with Controls

Conclusion
Hope this article would have helped you in understanding Windows Programming in VB.NET