Drawing Brush
The Drawing object in WPF represents a 2-D drawing that include shapes, text, video, image and other drawings. A Drawing Brush represented by the DrawingBrush object paints a surface with a drawing. The DrawingGroup, GeometryDrawing, GlyphRunDrawing, ImageDrawing, and VideoDrawing classes are inherited from the Drawing class. That means we can create any of these objects to be painted by a DrawingBrush.
Creating a Drawing Brush
The DrawingBrush element in XAML creates a drawing brush.
The following code snippet creates a drawing brush and sets the Drawing property. The Drawing property can be an element inherited from the Drawing such as a GeometryDrawing.
<DrawingBrush >
<DrawingBrush.Drawing />
</DrawingBrush>
We can fill a shape with a drawing brush by setting a shape's Fill property to the image brush. The code snippet in Listing 23 creates a rectangle shape sets the Fill property to a DrawingBrush.
<Grid Name="LayoutRoot">
<Rectangle Width="200" Height="200" Stroke="Black" StrokeThickness="0">
<Rectangle.Fill>
<DrawingBrush >
<DrawingBrush.Drawing>
<GeometryDrawing Brush="Yellow">
<GeometryDrawing.Geometry>
<GeometryGroup>
<RectangleGeometry Rect="50,25,25,25" />
<RectangleGeometry Rect="25,50,25,25" />
</GeometryGroup>
</GeometryDrawing.Geometry>
<GeometryDrawing.Pen>
<Pen Thickness="5">
<Pen.Brush>
<LinearGradientBrush>
<GradientStop Offset="0.0" Color="Blue" />
<GradientStop Offset="1.0" Color="Black" />
</LinearGradientBrush>
</Pen.Brush>
</Pen>
</GeometryDrawing.Pen>
</GeometryDrawing>
</DrawingBrush.Drawing>
</DrawingBrush>
</Rectangle.Fill>
</Rectangle>
</Grid>
Listing 23
The output looks like Figure 27.
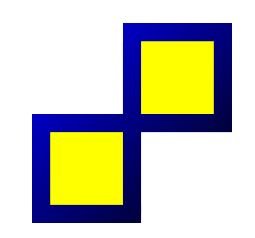
Figure 27. A shape filled with a Drawing brush
The Viewport property determines the size and position of the base tile when the TileMode of a DrawingBrush is not set to None, and the ViewportUnits property determines whether the Viewport is specified using absolute or relative coordinates. If the coordinates are relative, they are relative to the size of the output area. The point (0,0) represents the top left corner of the output area, and (1,1) represents the bottom right corner of the output area. To specify that the Viewport property uses absolute coordinates, set the ViewportUnits property to Absolute.
The TileMode property of DrawingBrush represents the tile mode that is a type if a TileMode enumeration. The TileMode enumeration has Tile, FlipX, FlipY, FlipXY, and None values.
The following code snippet sets the Viewport and TileMode properties of a DrawingBrush.
<DrawingBrush Viewport="0,0,0.25, 0.25" TileMode="Tile">
Figure 28, 29, and 30 show the tile modes values Tile, FilpXY, and FlipX.
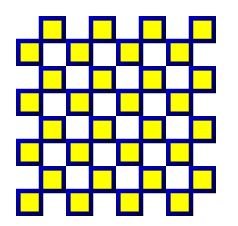
Figure 28. A shape filled with a Drawing brush in Tile mode
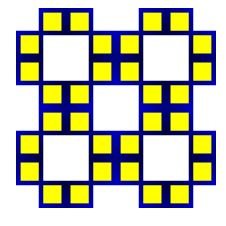
Figure 29. A shape filled with a Drawing brush with TileMode as FlipXY
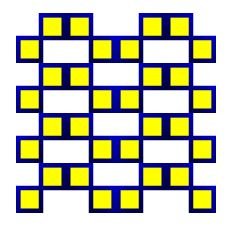
Figure 30. A shape filled with a Drawing brush with TileMode as FlipX
One of the key examples of tile mode is create a chess board like image that has a repeating rectangle with black and white background colors. The CreateARectangleWithDrawingBrush method listed in Listing 24 draws a chess board like rectangle with a drawing brush dynamically.
Private Sub CreateARectangleWithDrawingBrush()
' Create a background recntangle
Dim chessBoard As New Rectangle()
chessBoard.Width = 300
chessBoard.Height = 300
' Create a DrawingBrush
Dim blackBrush As New DrawingBrush()
' Create a Geometry with white background
Dim backgroundSquare As New GeometryDrawing(Brushes.White, Nothing, New RectangleGeometry(New Rect(0, 0, 400, 400)))
' Create a GeometryGroup that will be added to Geometry
Dim gGroup As New GeometryGroup()
gGroup.Children.Add(New RectangleGeometry(New Rect(0, 0, 200, 200)))
gGroup.Children.Add(New RectangleGeometry(New Rect(200, 200, 200, 200)))
' Create a GeomertyDrawing
Dim checkers As New GeometryDrawing(New SolidColorBrush(Colors.Black), Nothing, gGroup)
Dim checkersDrawingGroup As New DrawingGroup()
checkersDrawingGroup.Children.Add(backgroundSquare)
checkersDrawingGroup.Children.Add(checkers)
blackBrush.Drawing = checkersDrawingGroup
' Set Viewport and TimeMode
blackBrush.Viewport = New Rect(0, 0, 0.25, 0.25)
blackBrush.TileMode = TileMode.Tile
' Fill rectangle with a DrawingBrush
chessBoard.Fill = blackBrush
LayoutRoot.Children.Add(chessBoard)
End Sub
Listing 24
The output of Listing 24 looks like Figure 31.
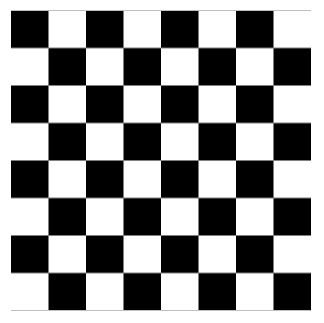
Figure 31. A chess board