While a brush is used to fill shapes with colors, a pen is used to draw outlines of a shape.
The Pen element in XAML is used to create a pen at design-time. The Brush and Thickness are only two required attributes you need to set to create a pen. The Brush property represents the brush that is used to draw an outline and Thickness property represents the thickness of the outline.
A Pen can be created by any kind of brushes discussed above and once a Brush is set for a pen, that brush is used to draw the outlines of a shape. The code listed in Listing 30 creates two Pen elements. First Pen is created using a SolidColorBrush and second Pen is created using a LinearGradientBrush.
<!-- SolidColorBrush Pen -->
<Pen x:Key="SolidYellowPen" Thickness="5" Brush="Yellow" />
<!-- GradientBrush Pen -->
<Pen x:Key="YellowGreenBrush" Thickness="5" >
<Pen.Brush>
<LinearGradientBrush>
<GradientStop Offset="0.0" Color="Green" />
<GradientStop Offset="1.0" Color="Yellow" />
</LinearGradientBrush>
</Pen.Brush>
</Pen>
Listing 30
The code snippet in Listing 31 creates a GeometryDrawing with a Line and two Rectnagle objects` and uses GeometryDrawing.Pen to draw the outline of the GeometryDrawing. As you can see from Pen element, the thickness of Pen is 5.
<Rectangle Width="200" Height="200" Stroke="Black" StrokeThickness="0">
<Rectangle.Fill>
<DrawingBrush >
<DrawingBrush.Drawing>
<GeometryDrawing Brush="Yellow">
<GeometryDrawing.Geometry>
<GeometryGroup>
<LineGeometry StartPoint="25,25" EndPoint="75,75" />
<RectangleGeometry Rect="50,25,25,25" />
<RectangleGeometry Rect="25,50,25,25" />
</GeometryGroup>
</GeometryDrawing.Geometry>
<GeometryDrawing.Pen>
<Pen Thickness="5" >
<Pen.Brush>
<LinearGradientBrush>
<GradientStop Offset="0.0" Color="Blue" />
<GradientStop Offset="1.0" Color="Black" />
</LinearGradientBrush>
</Pen.Brush>
</Pen>
</GeometryDrawing.Pen>
</GeometryDrawing>
</DrawingBrush.Drawing>
</DrawingBrush>
</Rectangle.Fill>
</Rectangle>
Listing 31
The output of Listing 31 looks like Figure 36. As you may notice, the outline of rectangles and line is just flat.
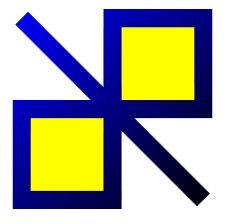
Figure 36
Now let's add some creativity to the Pen. Pen supports several more properties including StartLineCap, EndLineCap, DashCap, LineJoin, and MiterLimit.
StartLineCap and EndLineCap define the type of shape to use at the beginning and end of a stroke. The value can be flat, square, triangle and round. LineJoin property defines the type of joint used at the vertices of a shape's outline. The value of LineJoin is type of PenLineJoin enumeration that has Miter, Bevel, and Round values. The following code snippet sets StartLineCap, EndLineCap, and LineJoin properties to Triangle, Round, and Bevel respectively.
<Pen Thickness="5" StartLineCap="Triangle" EndLineCap="Round"
LineJoin="Bevel" />
The DashCap attribute property defines how the ends of each dash are drawn. DashStyle property defines the style of dash used in a pen. The value of DashStyle is a member of DashStyles class that can be a Dash, DashDot, DashDotDot, Dot, or Solid. MiterLimit propert represents the limit on the ratio of the miter length to half this pen's Thickness.
The following code snippet sets DashStyle, DashCap, and MiterLimit properties to DotDot, Triangle, and 0 respectively.
<Pen Thickness="5" StartLineCap="Triangle" EndLineCap="Round"
LineJoin="Bevel" DashStyle="DotDot" DashCap="Triangle" MiterLimit="0">
The code snippet in Listing 33 sets some of these properties using attributes of the Pen element,
<Rectangle Width="200" Height="200" Stroke="Black" StrokeThickness="0">
<Rectangle.Fill>
<DrawingBrush >
<DrawingBrush.Drawing>
<GeometryDrawing Brush="Yellow">
<GeometryDrawing.Geometry>
<GeometryGroup>
<LineGeometry StartPoint="25,25" EndPoint="75,75" />
<RectangleGeometry Rect="50,25,25,25" />
<RectangleGeometry Rect="25,50,25,25" />
</GeometryGroup>
</GeometryDrawing.Geometry>
<GeometryDrawing.Pen>
<Pen Thickness="5" >
<Pen.Brush>
<LinearGradientBrush>
<GradientStop Offset="0.0" Color="Blue" />
<GradientStop Offset="1.0" Color="Black" />
</LinearGradientBrush>
</Pen.Brush>
</Pen>
</GeometryDrawing.Pen>
</GeometryDrawing>
</DrawingBrush.Drawing>
</DrawingBrush>
</Rectangle.Fill>
</Rectangle>
Listing 33
The output of Listing 33 looks like Figure 37.

Figure 37
The Pen object in WPF is used to create a pen at run-time. The code snippet in Listing 34 creates a Pen object at run-time and sets some of these properties.
Private Sub CreateADynamicPen()
' Create two Rectangle and one Line Geometry
Dim line1 As New LineGeometry()
line1.StartPoint = New Point(25, 25)
line1.EndPoint = New Point(75, 75)
Dim rect1 As New RectangleGeometry()
rect1.Rect = New Rect(50, 25, 25, 25)
Dim rect2 As New RectangleGeometry()
rect2.Rect = New Rect(25, 50, 25, 25)
' Create a GeometryGroup and add the geometries to it.
Dim geoGroup As New GeometryGroup()
geoGroup.Children.Add(line1)
geoGroup.Children.Add(rect1)
geoGroup.Children.Add(rect2)
' Create a GeometryDrawing and add it to a DrawingGroup
Dim geoDrawing As New GeometryDrawing()
geoDrawing.Geometry = geoGroup
Dim drawingGrp As New DrawingGroup()
drawingGrp.Children.Add(geoDrawing)
' Create a linear gradient brush with five stops
Dim blueBlackLGB As New LinearGradientBrush()
blueBlackLGB.StartPoint = New Point(0, 0)
blueBlackLGB.EndPoint = New Point(1, 1)
' Create and add Gradient stops
Dim blueGS As New GradientStop()
blueGS.Color = Colors.Blue
blueGS.Offset = 0.0R
blueBlackLGB.GradientStops.Add(blueGS)
Dim blackGS As New GradientStop()
blackGS.Color = Colors.Black
blackGS.Offset = 1.0R
blueBlackLGB.GradientStops.Add(blackGS)
' Create a Pen to add to the GeometryDrawing
Dim blackBluePen As New Pen()
blackBluePen.Thickness = 5
blackBluePen.LineJoin = PenLineJoin.Bevel
blackBluePen.StartLineCap = PenLineCap.Triangle
blackBluePen.EndLineCap = PenLineCap.Round
blackBluePen.Brush = blueBlackLGB
geoDrawing.Pen = blackBluePen
' Create a DrawingBrush and fill a Rectangle with it
Dim drawingBrush As New DrawingBrush()
drawingBrush.Drawing = geoDrawing
' Create a Rectangle and fill with DrawingBrush
Dim rect As New Rectangle()
rect.Width = 200
rect.Height = 200
rect.Stroke = New SolidColorBrush(Colors.Black)
rect.Fill = drawingBrush
LayoutRoot.Children.Add(rect)
End Sub
Listing 34
The output of Listing 34 generates Figure 38.

Figure 38