This article shows how to create and sort the database in XML format using datatable, dataset and datarow classes in Visual Studio 2010.
Insert the data in xml file
DataTable - represents a table in XML format in memory.It manages data using Rows and Columns collections.
DataSource property are used to view the data in grid format on the form.
To create a blank row use NewRow() method of DataTable class and get reference of it using DataRow NewRow().
Use DataSet class to read and write the data on disc.
-
WriteXml(string filename)
-
ReadXml(string filename)
The dataset is a collection data table type object. It manages Tables collections.
Open the visual studio and drag Two button named (save and sort) three textbox and three level and one datagrid view controls on the form. Form looks like this:

Figure 1.
Now add the following c# code:
using System;
using System.Collections.Generic;
using System.ComponentModel;
using System.Data;
using System.Drawing;
using System.Linq;
using System.Text;
using System.Windows.Forms;
using System.IO;
using System.Xml;
namespace WindowsFormsApplication1
{
public partial class Form1 : Form
{
DataTable dt;
DataSet ds;
public Form1()
{
InitializeComponent();
}
private void Form1_Load(object sender, EventArgs e)
{
ds = new DataSet();
try
{
ds.ReadXml("F:/customer.xml");
dt = ds.Tables["Customer"];
}
catch (FileNotFoundException ex)
{
dt = new DataTable("Customer");
dt.Columns.Add("Cid");
dt.Columns.Add("Name");
dt.Columns.Add("Email");
ds.Tables.Add(dt);
}
dataGridView1.DataSource = dt;
}
private void button1_Click(object sender, EventArgs e)
{
DataRow dr = dt.NewRow();
dr[0] = txtCid.Text;
dr[1] = txtName.Text;
dr[2] = txtEmail.Text;
dt.Rows.Add(dr);
ds.WriteXml("F:/customer.xml");
MessageBox.Show(" Data has been saved");
txtCid.Clear();
txtEmail.Clear();
txtName.Clear();
}
private void button2_Click(object sender, EventArgs e)
{
XmlDataDocument xmlDatadoc = new XmlDataDocument();
xmlDatadoc.DataSet .ReadXml("F:/customer.xml");
ds = xmlDatadoc.DataSet;
DataView dt = ds.Tables[0].DefaultView;
dt.Sort = "cid ASC";
dataGridView1.DataSource = dt;
}
}
}
VB code:
Imports System.Collections.Generic
Imports System.ComponentModel
Imports System.Data
Imports System.Drawing
Imports System.Linq
Imports System.Text
Imports System.Windows.Forms
Imports System.IO
Imports System.Xml
Namespace WindowsFormsApplication1
Partial Public Class Form1
Inherits Form
Private dt As DataTable
Private ds As DataSet
Public Sub New()
InitializeComponent()
End Sub
Private Sub Form1_Load(ByVal sender As Object, ByVal e As EventArgs)
ds = New DataSet()
Try
ds.ReadXml("F:/customer.xml")
dt = ds.Tables("Customer")
Catch ex As FileNotFoundException
dt = New DataTable("Customer")
dt.Columns.Add("Cid")
dt.Columns.Add("Name")
dt.Columns.Add("Email")
ds.Tables.Add(dt)
End Try
dataGridView1.DataSource = dt
End Sub
Private Sub button1_Click(ByVal sender As Object, ByVal e As EventArgs)
Dim dr As DataRow = dt.NewRow()
dr(0) = txtCid.Text
dr(1) = txtName.Text
dr(2) = txtEmail.Text
dt.Rows.Add(dr)
ds.WriteXml("F:/customer.xml")
MessageBox.Show(" Data has been saved")
txtCid.Clear()
txtEmail.Clear()
txtName.Clear()
End Sub
Private Sub button2_Click(ByVal sender As Object, ByVal e As EventArgs)
Dim xmlDatadoc As New XmlDataDocument()
xmlDatadoc.DataSet.ReadXml("F:/customer.xml")
ds = xmlDatadoc.DataSet
Dim dt As DataView = ds.Tables(0).DefaultView
dt.Sort = "cid ASC"
dataGridView1.DataSource = dt
End Sub
End Class
End Namespace
Now run the application and enter the cid value, name and email id and click on the button save record
will be save in the xml file and also display on the grid view.
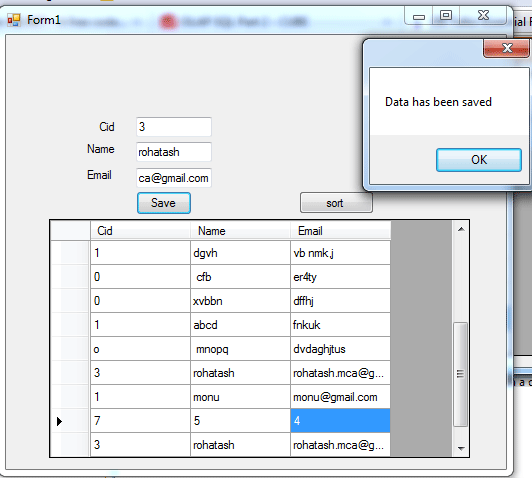 Figure 2.
To sort the record according to cid click on the button sort.