Introduction
ASP.NET GridView control available in Visual Studio 2008 allows data binding and editing without writing a single line of code. This article shows you you can do that.
The GridView control allows editing on a row-by-row basis. An editable GridView contains an additional column with an Edit button in each row. When the end user clicks on an Edit button that row becomes editable, causing the Edit button to change to Update and Cancel buttons and the other columns to become Textboxes. The end user can then update one or more column values and click update to save their changes.
In first demo, I'll show you how to fetch data from database.
Data Binding in GridView
1. Create an ASP.NET Web application
2. Drag and drop a SQLDataSource data control on page and configure data source. This action will add the following code to your page and you will also see a connection. Based on the selection you made on the Connection wizard, you will also see the SELECT statement with your SQL statement.
<asp:SqlDataSource ID="SqlDataSource1" runat="server"
ConnectionString="<%$ ConnectionStrings:VendorConnectionString %>"
SelectCommand="SELECT [VendorId], [VendorFName], [VendorLName], [VendorCity], [VendorState], [VendorCountry], [VendorDescription] FROM [Vendor]"> </asp:SqlDataSource>
3. Now drag and drop a GridView control on the page and set its DataSource to the SqlDataSource we created in the previous step.
Here is a GridView to show data using TemplateField.
<asp:GridView ID="GridView1" runat="server" AutoGenerateColumns="False" DataKeyNames="VendorId" Width="100%" DataSourceID="SqlDataSource1" CellPadding="4" ForeColor="#333333" GridLines="None" AllowPaging="True" PageSize="10" ShowFooter="False">
<Columns>
<asp:TemplateField HeaderText="Vendors">
<ItemTemplate>
<b>
<%# Eval("VendorId") %> -
<%# Eval("VendorFName") %> <%# Eval("VendorLName") %>
</b>
<hr />
<small><i>
<%# Eval("VendorCity") %>, <%# Eval("VendorState") %> <%# Eval("VendorCountry") %>
</i>
<br /><br />
<%# Eval("VendorDescription") %>
</small>
</ItemTemplate>
</asp:TemplateField>
</Columns>
<RowStyle BackColor="#FFFBD6" ForeColor="#333333" />
<FooterStyle BackColor="#990000" Font-Bold="True" ForeColor="White" />
<PagerStyle BackColor="#FFCC66" ForeColor="#333333" HorizontalAlign="Center" />
<SelectedRowStyle BackColor="#FFCC66" Font-Bold="True" ForeColor="Navy" />
<HeaderStyle BackColor="#990000" Font-Bold="True" ForeColor="White" />
<AlternatingRowStyle BackColor="White" />
</asp:GridView>
4. Now if you build and run the application, you will see formatted results like below:

Edit, Update, Cancel in GridView
Now second demo, let's see how we can edit, update, and cancel the edit option without writing a single line of code.
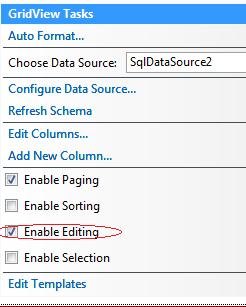
1. After completing the previous steps, right click on the GridView control and enable editing by right click on the GridView control and select Enable Editing menu item. See in the below figure.
2. Once you set Enable Editing in the GridView control, if you look at your code in the ASP.NET page, you will see an UPDATE SQL command is added to the page something like in the below code:
<asp:SqlDataSource ID="SqlDataSource2" runat="server" ConnectionString="<%$ ConnectionStrings:VendorConnectionString %>" SelectCommand="SELECT [VendorId], [VendorFName], [VendorLName], [VendorCity], [VendorState], [VendorCountry], [VendorDescription]
FROM [Vendor]"
UpdateCommand="UPDATE Vendor SET VendorFName = @VendorFName, VendorLName = @VendorLName, VendorCity = @VendorCity, VendorState = @VendorState,
VendorCountry = @VendorCountry, VendorDescription = @VendorDescription
WHERE VendorId = @VendorId">\
<UpdateParameters>
<asp:Parameter Type="int32" Name="VendorId" />
<asp:Parameter Type="string" Name="VendorFName" />
<asp:Parameter Type="string" Name="VendorLName" />
<asp:Parameter Type="string" Name="VendorCity" />
<asp:Parameter Type="string" Name="VendorState" />
<asp:Parameter Type="string" Name="VendorCountry" />
</UpdateParameters>
</asp:SqlDataSource>
3. Now build and run your application. The output looks like following where you can see an Edit link in the left most column.

Now if you click on Edit link, you will see that row is in edit mode with text boxes and Update and Cancel links have appeared. You can change the data of the columns and click on the Update link will update your database and the GridView control and Cancel link will cancel the operation and retain the previous form of data.

4. If you do not wish to change any column, you can set ReadOnly property of the field to True. If you wish to sort on a column, you can set the SortExpression property. This all can be done using the UI Properties dialog.
Here is some code that has ReadOnly and SortExpression sets for the columns.
<asp:GridView ID="GridView2" runat="server" AutoGenerateColumns="False" DataKeyNames="VendorId" Width="100%" DataSourceID="SqlDataSource2" CellPadding="4" ForeColor="#333333" GridLines="None" AllowPaging="True">
<Columns>
<asp:CommandField ShowEditButton="True" />
<asp:BoundField DataField="VendorId" HeaderText="VendorId" InsertVisible="False" ReadOnly="True" SortExpression="VendorId" />
<asp:BoundField DataField="VendorFName" HeaderText="VendorFName" SortExpression="VendorFName" />
<asp:BoundField DataField="VendorLName" HeaderText="VendorLName" SortExpression="VendorLName" />
<asp:BoundField DataField="VendorCity" HeaderText="VendorCity" SortExpression="VendorCity" />
<asp:BoundField DataField="VendorState" HeaderText="VendorState" SortExpression="VendorState" />
<asp:BoundField DataField="VendorCountry" HeaderText="VendorCountry" SortExpression="VendorCountry" />
<asp:BoundField DataField="VendorDescription" HeaderText="VendorDescription" SortExpression="VendorDescription" />
</Columns>
<RowStyle BackColor="#FFFBD6" ForeColor="#333333" />
<FooterStyle BackColor="#990000" Font-Bold="True" ForeColor="White" />
<PagerStyle BackColor="#FFCC66" ForeColor="#333333" HorizontalAlign="Center" />
<SelectedRowStyle BackColor="#FFCC66" Font-Bold="True" ForeColor="Navy" />
<HeaderStyle BackColor="#990000" Font-Bold="True" ForeColor="White" />
<AlternatingRowStyle BackColor="White" />
</asp:GridView>
Summary
In this article, we discussed how to display data in an ASP.NET GridView control available in Visual Studio 2008 and also how to make the GridView control editable and update data in the database.