A FontDialog control is used to select a font from available fonts installed on a system. A typical Font Dialog looks like Figure 1 where you can see there is a list of fonts, styles, size and other options. Please note a FontDialog may have different fonts on different system depending on what fonts are install on a system.

Figure 1
Creating a FontDialog
We can create a FontDialog control using a Forms designer at design-time or using the FontDialog class in code at run-time (also known as dynamically). Unlike other Windows Forms controls, a FontDialog does not have and not need visual properties like others. You use a FontDialog to list all the fonts and select one of them and usually apply selected fonts on controls or some contents.
Note: Even though you can create a FontDialog at design-time as well as at run-time, I recommend just use run-time method.
Design-time
To create a FontDialog control at design-time, you simply drag and drop a FontDialog control from Toolbox to a Form in Visual Studio. After you drag and drop a FontDialog on a Form, the FontDialog looks like Figure 2.
Figure 2
Adding a FontDialog to a Form adds following two lines of code.
Friend WithEvents FontDialog1 As System.Windows.Forms.FontDialog
Me.FontDialog1 = New System.Windows.Forms.FontDialog()
Run-time
Creating a FontDialog control at run-time is merely a work of creating an instance of FontDialog class, set its properties and add FontDialog class to the Form controls.
First step to create a dynamic FontDialog is to create an instance of FontDialog class. The following code snippet creates a FontDialog control object.
Dim fontDlg As New FontDialog
ShowDialog method of FontDialog displays the FontDialog. The following code snippet calls the ShowDialog method.
fontDlg.ShowDialog()
Once the ShowDialog method is called, you can pick a font on the dialog.
FontDialog Properties
Show Properties
A FontDialog control can have a color drop down that allows users to select a color of the selected font. A FontDialog can also have Apply and Help buttons as you can see in Figure 3.
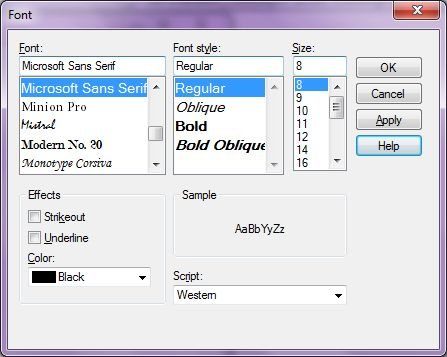
Figure 3
ShowColor, ShowApply, and ShowHelp properties can be set to true to show these options. The ShowEffects property represents whether the dialog box contains controls that allow the user to specify strikethrough, underline, and text color options.
The following code snippet sets these properties to true.
fontDlg.ShowColor = True
fontDlg.ShowApply = True
fontDlg.ShowEffects = True
fontDlg.ShowHelp = True
Maximum and Minimum Font Size
We can restrict the maximum and minimum font size by setting MaxSize and MinSize properties. The following code snippet sets these properties to 40 and 22 respectively.
fontDlg.MaxSize = 40
fontDlg.MinSize = 22
Font and Color
The Font and Color properties represent the selected font and color in a FontDialog. The following code snippet gets these properties and sets font and color of a TextBox and a Label controls.
If (fontDlg.ShowDialog() = DialogResult.OK) Then
TextBox1.Font = fontDlg.Font
Label1.Font = fontDlg.Font
TextBox1.BackColor = fontDlg.Color
Label1.ForeColor = fontDlg.Color
End If
Summary
A FontDialog control allows users to launch Windows Font Dialog and let them select a font and font color. In this article, we discussed how to use a Windows Font Dialog and set its properties in a Windows Forms application.